

The Cisco AnyConnect VPN allows you to remotely access campus resources which would otherwise be unavailable externally.
Why use the Cisco AnyConnect VPN service?
Reasons you may want to use the Cisco Anyconnect VPN service:
- To secure your network traffic between OSU and your remote location.
Note: Only traffic to campus resources are tunneled through the VPN connection. - To access resources which are only available from campus networks including databases and network file shares.
Installation
If you are using an OCIO managed computer, Cisco Anyconnect will already be installed. Otherwise faculty and staff may download the installer from Self Service.
Navigate to the self service portal located at https://go.osu.edu/it
- Log in using your Ohio State Username and Password.
- Select Order Services.
- Select Software Services and then choose the Site licensed software request.
- Click Next and select the option for Cisco AnyConnect
- Select the Operating System, License Type, and follow the prompts to complete your order.
- Download information will be provided via OSU email.
Connecting
Connecting to the OCIO Anyconnect VPN requires BuckeyePass. If you have not registered for your BuckeyePass account, please see Registering Your Account for details and instructions. Before you continue, you must be registered for your BuckeyePass account.
To start the VPN process, open the VPN program Cisco AnyConnect Secure Mobility Client. Steps may vary depending on your operating systems:
- Windows
- To launch the Cisco AnyConnect VPN client click the Start button, locate program folder Cisco, and click Cisco AnyConnect Secure Mobility Client.
- MacOS
- To launch the Cisco AnyConnect VPN client, select the Cisco AnyConnect Secure Mobility Client located in your Applications folder.
- Linux
- Note: Linux steps may vary depending on the distribution.
To launch the Cisco AnyConnect VPN client, select the Application menu and then select the Cisco AnyConnect Secure Mobility Client application.
If you need help installing the client, please see the installation instructions above. Once the application is opened, you will be presented with the connection screen telling you it is ready to connect.
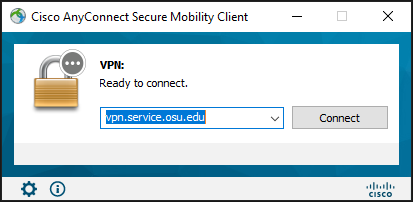
VPN server is vpn.service.osu.edu.
Click the Connect button.
- If you are an OCIO Managed IT Service (MITS) customer connecting from an OCIO managed computer, select the OSULAN group profile.
- For VPN access equivalent to general campus network access, select the OSUNet group profile.
- For additional information on the groups available, please see KB04914.
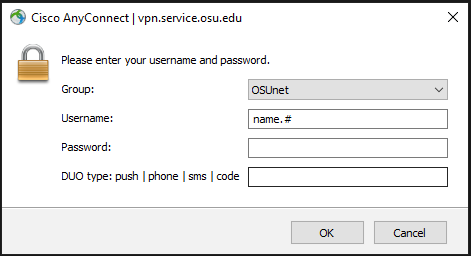
Next, enter the Ohio State Username (lastname.#) in the Username field.
Then, enter the Ohio State Password in the Password field.
Finally, enter your preferred BuckeyePass authentication method, and click OK. You do this by typing push, sms, or the passcode generated from your Duo Mobile app into the DUO type field.
BuckeyePass Method/Code Options
| Method | Type... |
|---|---|
| push | To push a login notification to your smart phone or tablet (if you have Duo Mobile installed and activated on your device), in the BuckeyePass Method/Code field type the word push then review the request and tap "Approve" on your smart-device to log in. Examples: "push" |
| passcode | To log in using a passcode, in the BuckeyePass Method/Code field type the passcode, either generated with Duo Mobile app, sent via SMS, or generated by your hardware token. Examples: "191215” or “1456789" |
| sms | To get a single, one-time passcode sent via text message, in the BuckeyePass Method/Code field type the word sms. Your login attempt will fail — log in again with the new passcode. Example: "sms” then “1456789" |
You can also add a number to the end of these options if you have more than one device registered. For example, push2 will send a login request to your second smart-device, push3 will send a login request to your third smart-device, etc. If you choose to enter the number 1 after the words push, you would be pushing your default device. However, this is not necessary as just typing push will also use your default device.
Once you have successfully connected and confirmed the BuckeyePass authentication, you may see a final screen with additional information or a disclaimer. Click Accept if you wish to continue. This prompt may vary or not be present depending on your operating system.
You will then be connected and should now have access to the internal resources.
Device Options
Devices you can use for authentication are in the order they were registered on buckeyepass.osu.edu. If you registered multiple devices, they would be used by entering their associated number after the push or sms option in the BuckeyePass Method/Code field.
If you change your default device on buckeyepass.osu.edu you will be changing the order in which your devices were registered, ultimately changing the number you will place after the push or sms, if needed.
For details on managing the devices and settings in your BuckeyePass account please see Manage Devices & Settings.
Last modified: Sep 21, 2023